Human Body 3D Scanning and VR Implementation Manual

- Posted by ostadabbas
- Posted in Research
Instructions on Creating 3D Human Models and Virtual Reality Implementation of Them
Reported by: Sophia Franklin and Caleb Lee
ACLab Students Mentors: Shuangjun Liu, Naveen Sehgal, Xiaofei Huang, and Isaac McGonagle
YSP Summer 2019
Overview:
This manual is a comprehensive compilation of the steps and technology necessary to create lifelike, 3D rendered avatars of humans. The scans can then be imported into software that works with VR environments, where the avatar can be controlled and manipulated. The various steps can be done with off the shelf technology and free software. Beginning with an overview of the necessary hardware/software, the manual goes over the full body scanning process, specific face scanning process, rigging an avatar, importing a finished avatar into VR, and manipulating the avatars in VR. In summary, we will describe the following topics in these sections:
- Chapter 1: Hardware/Software for VR and Avatars
- Chapter 2: Full Body and Face Scanning Process
- Chapter 3: Rigging Process
- Chapter 4: Importing a rigged mesh into Unity
- Chapter 5: Baking a texture into Blender
- Chapter 6: Getting an animated avatar into a VR environment
Chapter 1: Hardware/Software for VR and Avatars

For optimal 3D scanning, we’ve devised a series of equipment, procedures, and changes in the scanning and rigging process. These are what we’ve tested, but there are other possible solutions.
- Hardware
- Microsoft Kinect V.1 XBOX 360: This is the most important piece of equipment, as it’s needed to actually take the scans.
- Rotating Turntable 360 Degree Plate: This motorized turntable plate allows the human subject to stay in one place while capturing the 3D data.
- Lights: These wide-brim photography lights are helpful depending on room lighting or test subjects. Type of light is up to the purchaser.
- Software
- General PC requirements: Windows 7 with >= 2 GB RAM
- Kinect for Windows SDK 2.0
- Skanect: Skanect links up to the Kinect, allowing for an easy transfer process between scan and avatar. The interface is simple, and it still has room for edits (this version only works on Windows 7 or below)
Chapter 2: Full Body and Face Scanning Process

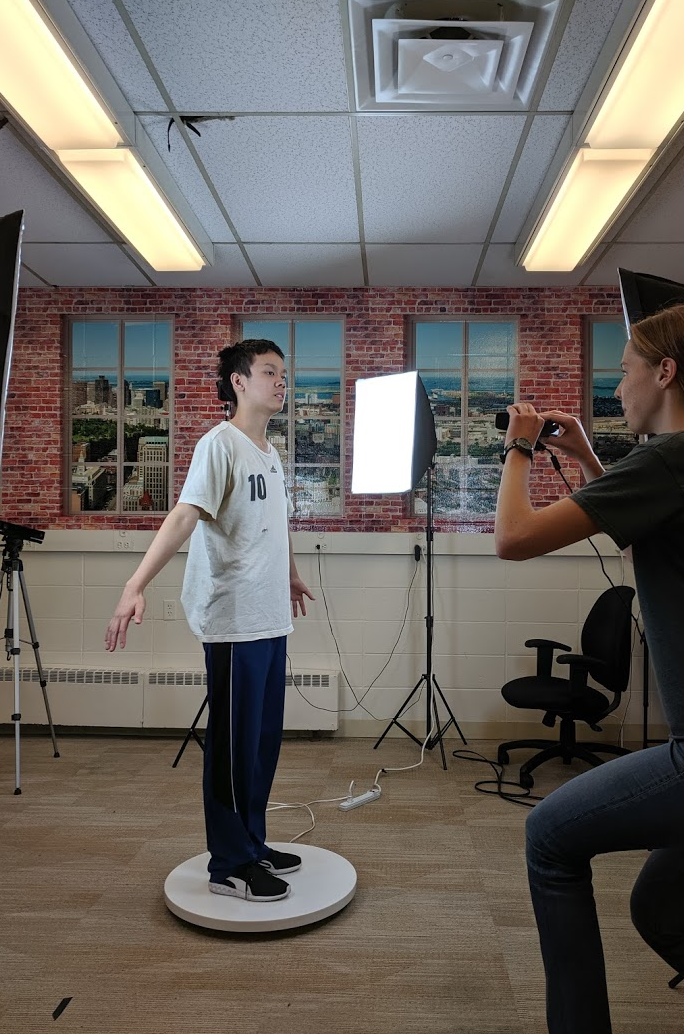
- Open Skanect on the Windows 7 computer, and plug in the Kinect into the PC USB and power supply
- Pre-record setup:
- Under the button labeled “Prepare,” click on “New”
- Set scene to “body”
- Set aspect ratio to “height x 2”
- Set bounding box to 1.2 x 2.4 x 1.2
- Now go to “Settings” which is underneath “New”
- Set feedback quality to “medium”
- Position the rotating disk in the center of the room, for even lighting,
- It’s fine to use the three photography lights depending on the subject or necessary resolution. Use extra lighting if:
- The subject has tanner skin or is wearing lighter clothing (for contrast).
- It’s important for body parts, especially the hands, to be defined. We found that we could get high resolution/definition hands with all three lights at a high level.
- The lights also have two settings on each, so you can play around with the lighting depending on the situation.
- It’s fine to use the three photography lights depending on the subject or necessary resolution. Use extra lighting if:
- Sit ~2 feet away from the subject being scanned
- Camera placement affects the area available to scan
- If the camera holder cannot stretch their arms over the subject’s head, choose a chair that you could later climb onto to cover the head.
- Click record. There will be a 3 second delay.
- Begin scanning in sweeping up and down motions
- There’s a relatively simple yet important process for scanning. It should only take around 1.5 minutes to complete a scan, with two full rotations around the spinning plate.
- The first rotation is to completely cover only the body (minus the head, neck). Tilt the camera up and down to cover the body with ‘green’ until the rotation is finished and the body is fully covered.
- The second rotation is ¼ facial covering and ¾ head, shoulders, and ears. You should begin by getting a full, clear scan of the subject’s unmoving face, and then by finishing the head in the rest of the rotation. Make sure to cover the top of the head, with smaller up and down sweeping motions for the neck and scalp.
- Once scanned, stop recording. The easiest way to finish recording is by quickly moving the handheld camera away from the subject. It’ll ask to go back to the previous pose – stop recording the scan.
- There’s a relatively simple yet important process for scanning. It should only take around 1.5 minutes to complete a scan, with two full rotations around the spinning plate.
- Edit and finish the scan
- To complete the scan, go into the process tab and click on the Watertight Mesh. This will edit any holes or discolorations to leave a finished 3D avatar.
- After the coloration and editing, crop any of the base out with the Move and Crop option.
- While colorizing, your screen should look something like this:
- Export/save scan to computer
- Save the scan to the correct folder using specific naming process. You can drag the file onto Desktop for easy access or further use.
Troubleshooting:
- Try to avoid scanning the face more than once, as the delicate structure can be read incorrectly by the scan resulting in double features or messed-up lighting.
- Keep the hand open in a claw shape to get easy definition
- Full-color clothing shows up better and can ‘hide’ any holes or discolorings that happen. Darker clothing also works well for this purpose, but it’s harder to distinguish from.
Clear Face Scanning Process – Object Mode
- Start a new scan, and this time, select object instead of body.
- Set the bounding box to 0.3 x 0.3 x 0.3.
- Position self so handheld camera’s box surrounds head.
- Make sure the area is well-lit without direct lighting on the subject.
- Looking at a single point, move the camera from side-to-side until ear to ear is ‘green’
- This face scan concentrates on the face only, with its boundaries of the ears, chin, and forehead.
- It’s fine to go over the face multiple times with this process, as the added proximity is more specific and will not read multiple faces.
- Reminder – keep eyes fixed on one point the whole time, and only swivel the camera.
- When satisfied with the scan, jerk the camera away to stop scanning, and stop the recording process.
- Follow the same editing and exporting/saving process minus “move and crop”, as it’s not necessary.
Chapter 3: Rigging Process
After taking complete scans, the next steps involve different software and procedures:
- Save and export with at most 300,000 faces as a .ply file on the desktop.
- Open the Blender app
- If you have a pre-designed skeleton/armature, open this file and import your mesh.ply. The scan will appear on top of the skeleton, ready for the next steps.
- If you don’t have it, there are separate instructions at the bottom.
- Import your .ply file from FILE – it’s easier to find the file if it’s on desktop
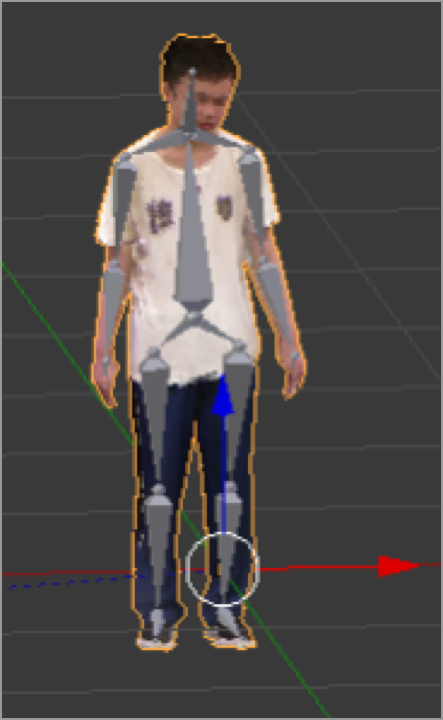
- Start the rigging process – drag and maneuver each bone to match each body part
- Make sure that there aren’t any extruding bones, and each bone is connected together, or at least touching.
- The joints of the bones should be in the same places as the joints of the mesh.
- Once the skeleton is rigged, the next steps are to fuse the skeleton and mesh together for combined movements.
- On the right toolbar, select the mesh, and on the middle toolbar, change from “object mode’ to “edit mode” using the two arrows.
- On the left-hand toolbar (if you don’t see it press ‘t’), under “Tools,” click on “Remove Doubles”.
- Change “Merge Distance” to 0.01. This will greatly reduce the number of vertices your mesh has, which is important for the next step of binding the mesh to the skeleton/armature. *Note: The maximum number of vertices allowed varies for each mesh, but 0.01 should work for any mesh.
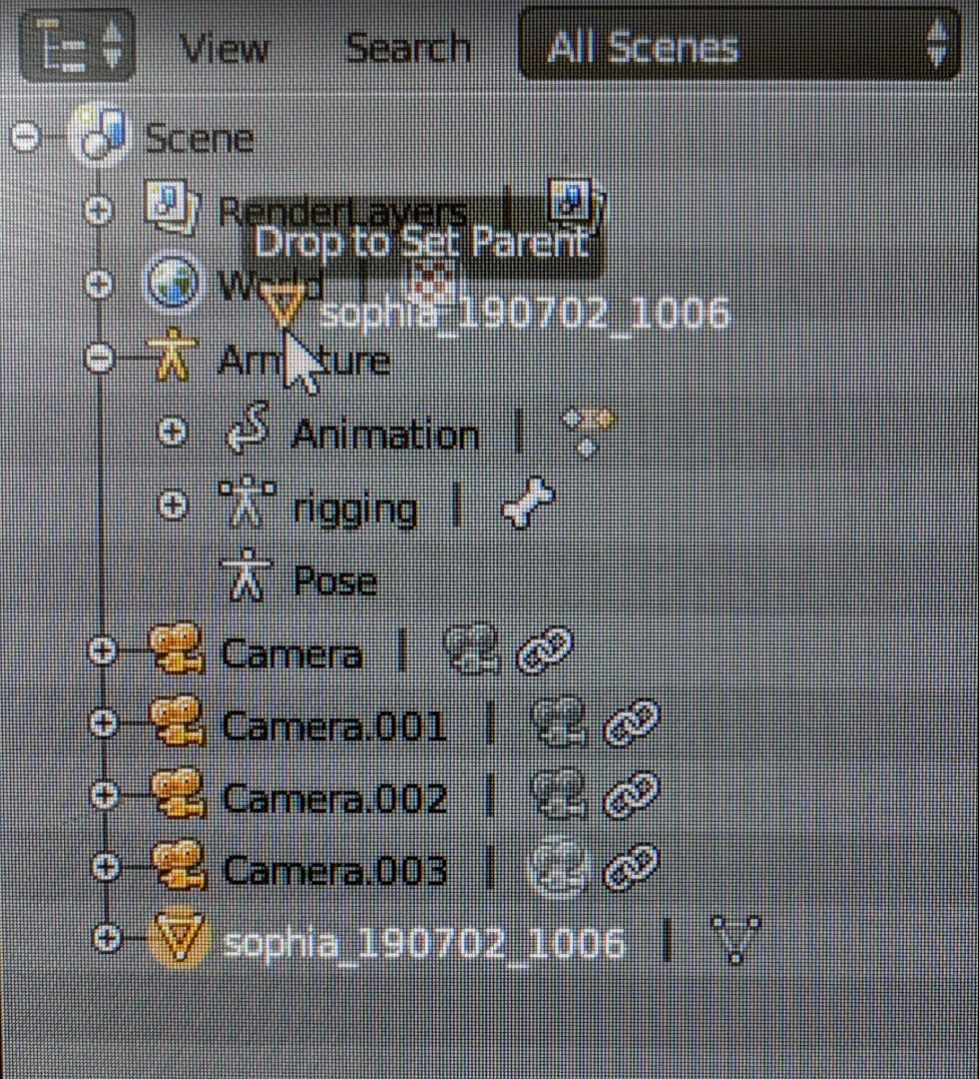
- Switch back to object mode. Select the mesh, drag it to armature (or whatever you named your skeleton) and when you see the message “drop to set parent,” release it. Then select “with automatic weights”
- If you get this error: “Bone Heat Weighting: Failed to find a solution for one or more bones:”, there’s likely an issue with vertice count – make sure to remove doubles with a merge distance of 0.01. If your mesh has under 100,000 vertices, it should bind to the skeleton/armature without any problem.
- If that doesn’t work, StackExchange and Youtube tutorials can provide guidance on incorrect processes.
Troubleshooting: Vertice Tests for highest-definition meshes
As merge distance for removing doubles approaches 0, the number of removed vertices decreases, and the mesh graphics get worse. The goal is to find the maximum number of vertices a mesh can have (to maximize graphics) and still successfully bind to the armature. In other words, find the minimum merge distance allowed.
- Open a new blender file and import your PLY mesh
- Quickly rig it with skeleton/armature, it doesn’t have to be a thorough job
- Save it to the desktop as verticesTesting_Name.blend
- Select your mesh, go to edit mode, remove doubles, select a merge distance “M” that is less than 0.01
- Switch back to object mode, and parent it to the armature.
- If you get an error, close the blender file without saving, and open it up again. This time, remove doubles with a merge distance greater than M on the interval M-0.01, and then parent again. Repeat this step until the mesh successfully binds to the armature, and move to part b.
- If the mesh successfully binds to the armature, close the blender file without saving, and open it up again. This time, remove doubles with a merge distance less than M and then parent again. Repeat this step until you get an error, and move to part a
Chapter 4: Importing a rigged mesh into Unity
Once rigging is finished, the next step is to put your avatar in the Virtual Reality environment. This can be done through the VR platform Unity. Open it up on your computer. If it isn’t already there, here is a link to download the application:
- Under where it says “sample scene,” right click, select “3D object,” and choose “plane.” This will create a platform for your avatars in the build environment, which is the center of the screen. Once you create the plane, you will see it appear there,
- In order to see the plane (and other items you will add to the build environment) in VR, you must enable it in Unity settings.
- At the top of the screen, go to “edit” next to “file”
- From the drop down menu, select “project settings”
- From “project settings,” select “player.” This will open a toolbar on the right side of the screen under the Inspector Tab, called “player settings.”
- Under “player settings,” check the box next to “virtual reality supported.” If you press the play button (the arrow at the top of the screen) you will be able to see the plane in 3D when you put on the VR headset.
- To import new objects (such as your rigged mesh) into Unity, go inside the assets folder, right click, and select “import new asset.” You can choose your blender file from here. You will see it appear in the assets folder.
- To see your rigged mesh or any other 3D assets in VR, drag and drop them onto the build environment.
***If you try to import your blender file directly into Unity, you will notice that the meshes are solid (no color), even though in Blender they had texture. This is because Unity does not retain texture when Blend files are imported. To add texture to your mesh, you have to import it into Unity separately as a PNG file, containing the “skin,” or unwrapped version, of your mesh. To create this, you must bake a texture in Blender, which you MUST do before importing***
Chapter 5: Baking a texture into Blender

- Re-open the blender file with your rigged mesh
- Select your armature and switch from “Edit mode” to “Pose mode”
- Press ‘a’ to select all the bones in light blue
- Do Ctrl + r to reset the pose, and select the mesh, which should be in base position
- On the toolbar at the bottom of the screen, switch to UV/Image Editor
- Click on the plus sign next to “New,” set the name to “YourName_bake” and set the height and width to 2048 px, then click OK. You will see black space, which is what is supposed to happen. Zoom out.
- Your mesh should be selected; change from “Object mode” to “Edit mode”
- Type ‘u’ and select “Smart UV Project” and hit OK (the default settings for the Smart UV Project are fine)
- Click on the triangle shaped button in between the wrench and the sphere (called ‘data’ if you hover over it) Scroll down until you get to UV Maps. Hit the plus sign to the right of the camera to create a new UV Map. Call it the same thing as your UV image (YourName_bake). Make sure both the UV image and the UV Map you created are selected.
- In the same toolbar with the triangle shaped(data) button, click the camera(render) button, and scroll down until you see the Bake option.
- Switch Bake Mode from “Full Render” to “Vertex Colors” and hit “Bake.
- Switch your Mesh from “Edit mode” back to “Object mode.” You should now see an unwrapped version of your mesh with color.
- On the bottom toolbar, click on “Image*” and select “Save As Image.” Name it accordingly, and save it to the desktop as a PNG file. This is your skin, or texture file.
- You will notice that your rigged mesh has lost all of it’s texture. That is because it has been unwrapped. Save this Blender file as “name_unwrapped.blend”
Chapter 6: Getting an animated avatar into a VR environment

- Import your unwrapped rigged mesh into Unity and add it to the build environment using the steps from Chapter 4
- Also import the texture file you created in Chapter 5
- Under SampleScene, you should see your unwrapped rigged mesh as one of the assets. Click on the arrow next to it, and in the dropdown menu, you will see both the armature and your mesh.
- Select the texture file, and drag it onto the mesh, which is underneath Armature. Your rigged mesh should now have color, the way it appeared in Blender before it was unwrapped.
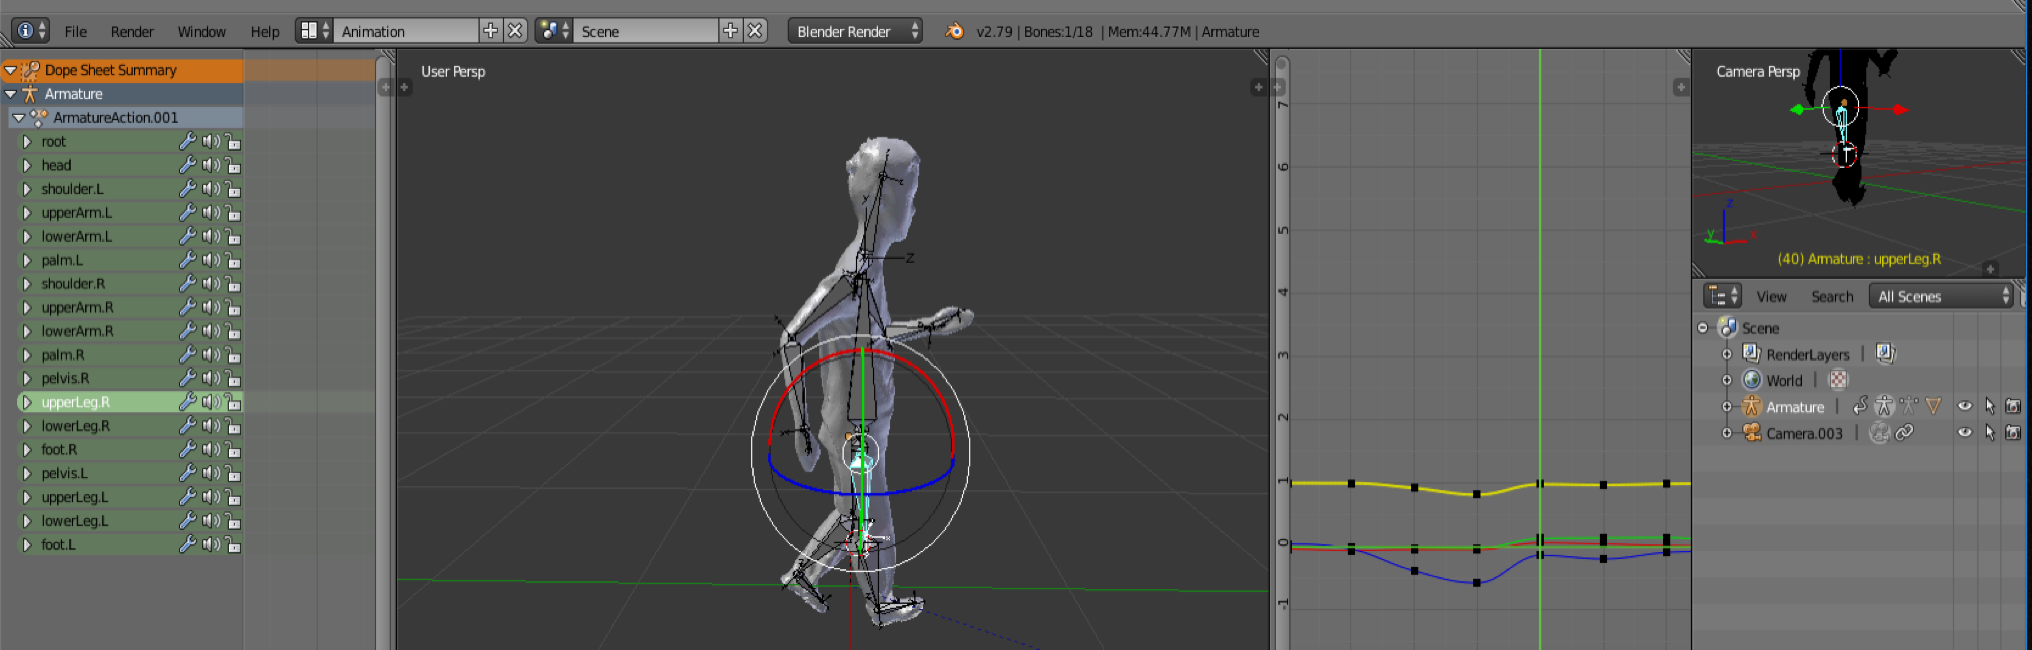
- In the assets folder, select your rigged mesh, and go to the inspector tab on the right. Select “animation”
- Scroll down, make sure the clip “default take” is selected. This will set the animation in Unity to whatever the animation the rigged mesh had in Blender. You can create your own by following this tutorial: https://www.youtube.com/watch?v=gMuJCiLS4yo
- Keep scrolling down until you see “Loop Time.” Check the boxes next to “loop time” and “loop pose.” This will make your mesh perform its animation infinitely in VR.
- In the assets folder, click on the arrow next to your rigged mesh, and it will expand to something like this:
- Drag the play button labeled “Default Take” onto your mesh in the build environment with the plane. You should see your mesh running through its animation routine over and over once you put on the VR headset.
Helpful Links :
- Scanning Process
- Rigging Process
- Also included in documents above
- https://www.youtube.com/watch?v=EcNGeIV0BsU
- https://docs.blender.org/manual/en/latest/rigging/index.html
- Texture/Importing into Unity